Segmentation can be hugely beneficial to your reporting needs. If you have sections of your website dedicated to different products, customers or geographic areas and you would like to see the marketing, call, and goal data for the different sections in isolation, then this feature is ideal.
If you have a hierarchical structure to your site and would like to report on it in a hierarchical format, this feature is perfect too.
Example 1:
You have multiple products on your site with dedicated pages for this, and you want to see the marketing/call/goal data against each specific product.
Segmentation allows you to look at the overall data for your website, then drill down into the data for segmented sections in isolation.
Example 2:
You sell newly-built property and want to see data for the overall website, then split into specific regions, then into specific housing developments.
If your website structure works regionally and then has sub-sections within these regions for offices, shops, property etc., you can arrange your segmentation to suit this. You would use Segment Groups to collect Segment data together.
Step 1: Locate the segmentation filter on the upper right side of your Portal, beneath the date range picker tool
Step 2: Expand the filter and click on your preferred segment or start typing the segment name if it is not in the immediate list
Step 3: Browse the Portal with this filter applied to see data which is assigned to the particular segment
Time Zone: Each call tracking installation can only record data in one time zone - please consider this if you are looking to segment domains under one brand for multiple countries. If the data being recorded in one time zone is a problem (e.g. if you are segmenting UK & US domains), then you should subscribe to multiple installations instead of segmenting one.
Marketing Source: The marketing source of the land can be lost when web visitors travel if you have subdomains, which can lead to poor channel attribution. For example, a visitor lands via Paid Search, navigates cross-subdomain and makes a call. The call would be attributed to the Website Referrer channel (in Last Click (absolute) mode), and the referring website would be the one in the other segment which the visitor originated from.
To avoid this loss of marketing source, we can add your subdomains for the segments as external domains, and you should add the line of code as explained in our external domains article.
Billing: We cannot offer split billing to show the costs driven by different segments; your invoices will reflect costs and usage for the installation as a whole. If this is an issue, it may be more suitable to subscribe to multiple installations instead of segmenting one.
Installation Management and Support: Each call tracking installation can only be looked after in one time zone, so that projects and support can be realistically managed - Please consider this if you are segmenting domains for multiple countries. If the installation management in one timezone is an issue, then you should subscribe to multiple installations instead of segmenting one, and the installation manager can therefore support the separate teams relevant to each time zone.
Integrations: We have the ability to segment your data in Infinity, however this does not necessarily mean that it will segment when passing into third party integrations. A way to overcome this is to have multiple third party software accounts, such as Google Analytics.
In this example, you should set up at least one integration per GA account, and when setting it up you should choose to send the call data from the relevant segment to the relevant GA account instead of choosing the default setting of 'all calls'.
Segments only, no Segment Groups.
- Navigate to the Admin tab in the Portal
- Go to Tracking Settings
- Under the black Segmentation heading, click on Segments
- Click on Create new Segment
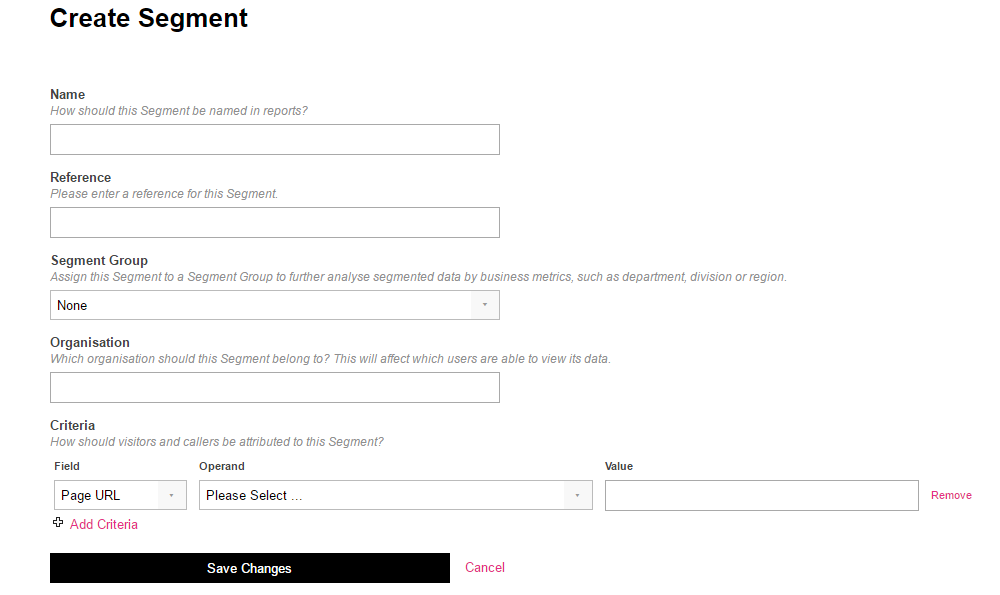
- Name: pick a relevant segment name for reporting
- Reference: optional field for more internal notes
- Segment Group: leave as 'none'
- Organisation: start typing the name of your call tracking installation, you should get an option appear on a drop-down menu. Select this.
Criteria: Choose Page URL as the field, Includes (case insensitive) as the operand, then for the value enter a keyword which will be present in the URLs which you would like to collect data into this segment. E.g. 'home-security', or 'plastic' or whatever product/service data is to be collected in this segment which can be commonly identified in the URLs.
We highly recommend navigating to a URL which should capture data in this segment, make a call from the URL to the Infinity number displayed, then check which segment this data is allocated to within the Portal. You can go in and tweak your segment settings if necessary.
Including Segment Groups
You should require a list of tracking pool names, destination numbers, features and number types. Then you need to know the segment names, which DGRPs should report under these, and the URL for the segment. You then need them to tell you which other layers they would like, which segments should be connected to these, and each of their names. There is an excel spreadsheet for this in the shared Templates folder.
Create Segment Groups
- Navigate to the Admin tab in the Portal
- Go to Tracking Settings
- Under the black Segmentation heading, click on Segment Groups
- Click on Create Segment Groups
- Name: pick a relevant segment group name for reporting, e.g. a housebuilder client might choose a Region which they would like property segments to sit within
To Save, hit Create.
We recommend creating all the segment groups you need to begin with, before moving on to segments. This will streamline the process and ensure that every segment can be linked to a segment group.
Create Segments
- Navigate to the Admin tab in the Portal
- Go to Tracking Settings
- Under the black Segmentation heading, click on Segments
- Click on Create new Segment
- Name: pick a relevant segment name for reporting
- Reference: optional field for more internal notes
- Segment Group: choose the relevant segment group which you would like this segment to reside under. E.g. a house builder client might choose a regional segment group which a housing development may sit within.
- Organisation: start typing the name of your call tracking installation, you should get an option appear on a drop-down menu. Select this.
- Criteria: Choose Page URL as the field, Includes (case insensitive) as the operand, then for the value enter a keyword which will be present in the URLs which you would like to collect data into this segment. E.g. 'home-security', or 'plastic' or whatever product/service data is to be collected in this segment which can be commonly identified in the URLs.
