This article explains how to integrate your Infinity and Adobe Analytics accounts, enabling you to see Infinity data within Adobe Analytics.
Adobe Analytics is a set of tools for predictive and real-time analytics that can be integrated into third-party sources. Integrating your Infinity account with your Adobe Analytics account means that you can view phone calls and other data that you wish to share from your Infinity account in Adobe Analytics.
Our integration utilises Adobe’s Data Sources feature, which is designed to link offline events (such as phone calls) with online events.
A key element of Data Sources is the use of a transactionID, which is used to tie offline data to an online transaction (like a lead or purchase generated online). You will need to add some code to your site to generate a transactionID for each page view that takes place.
Once this transactionID has been generated it will then need to be set in the Adobe Analytics & Infinity JavaScript Variables.
Then you can configure the integration from within the Infinity portal.
Additional information on the Adobe Analytics platform can be found here
Adobe Analytics is a powerful enterprise-level analytics suite. We recommend the integration be configured by someone familiar with the Adobe Analytics ecosystem.
A summary of the required steps is as follows:
- Obtain the FTP details for your Adobe Analytics account
- Enable transactionID storage in Adobe Analytics
- Add script to generate transactionID on your site
- Set transactionID in the Adobe Analytics JavaScript variable
- Add Infinity Javascript to your site, ensuring you include the snippet to capture the transactionID
- Configure the integration in the Infinity portal
To set up an Adobe Analytics integration, you’ll need some FTP details for your Adobe Analytics account, namely the Host url, your username and password.
The FTP host is typically something like ftp.omniture.com or ftp2.omniture.com and is quite generic, your username and password will be unique to you.
To locate your FTP Host, Login, and Password, access your Adobe Analytics account and select FTP Info next to the Data Source entry in the Data Sources Manage tab (Analytics > Admin > Data Sources). If you need any assistance, please contact your Adobe Account Manager.
You’ll also need to make sure your Infinity subscription caters for setting up an additional integration. This will be a priced bolt-on for Small Business packages, and may be inclusive for Professional and Enterprise packages depending upon the number of integrations you’ve already activated. For more information, please contact the Infinity support team, who will be able to offer advice.
Enabling transactionID Storage
Before transactionID values are recorded, Transaction ID Storage must be enabled for the report suite selected in the Report Suite Manager. This setting is located at
Analytics > Admin > Report Suites > Edit Settings > General > General Account Settings.
To see whether transactionID Storage is enabled for a report suite, go to Analytics > Admin > Data Sources > Manage

The Manage tab displays the status of Transaction ID Recording.
90 Day Expiry
By default, transactionID values are remembered within Adobe Analytics for 90 days. If your offline interaction process is longer than 90 days, you can contact Adobe to have the limit extended.
Generating the TransactionID
You will then need to generate the transactionID on your site. Further details on the syntax and possible values can be found here
Here’s an example snippet to help you generate a TransactionID. We’d recommend you consult with a developer and test thoroughly before adding to your site.
<script>
    generateTransactionID = function() {
        var lut = []; for (var i=0; i<256; i++) { lut[i] = (i<16?'0':'')+(i).toString(16); }
        var d0 = Math.random()*0xffffffff|0;
        var d1 = Math.random()*0xffffffff|0;
        var d2 = Math.random()*0xffffffff|0;
        var d3 = Math.random()*0xffffffff|0;
        return lut[d0&0xff]+lut[d0>>8&0xff]+lut[d0>>16&0xff]+lut[d0>>24&0xff]+
        lut[d1&0xff]+lut[d1>>8&0xff]+lut[d1>>16&0x0f|0x40]+lut[d1>>24&0xff]+
        lut[d2&0x3f|0x80]+lut[d2>>8&0xff]+lut[d2>>16&0xff]+lut[d2>>24&0xff]+
        lut[d3&0xff]+lut[d3>>8&0xff]+lut[d3>>16&0xff]+lut[d3>>24&0xff];
    };
    transactionID = generateTransactionID();
</script>
Adobe Analytics JavaScript Variable
Once the unique transactionID has been generated it then needs to be set in the Adobe Analytics JavaScript variable. It may be advisable to have someone from Adobe advise on the specific code you need to implement but Adobe has some documentation one of your developers could take a look at here
You will then need to add the Infinity tracking code to your website. You can use our Javascript generator to create this, however you must ensure that you add the setCustomVar line (shown below) so that it will capture the transactionID that has been generated. This is not present in the code sample from our Javascript generator so must be added manually.
<script>
    <!-- Infinity Tracking Code v2.0
    Copyright Infinity 2017
    www.infinitycloud.com -->
    <script type="text/javascript">
    var _ictt = _ictt || [];
    _ictt.push(['_setIgrp','XXXX']); // Installation ID
    _ictt.push(['_enableGAIntegration',{'gua':true,'ga':false}]);
    _ictt.push(['_enableAutoDiscovery']);
    _ictt.push(['_setCustomVar', ['adobe_txid', transactionID]]);
    _ictt.push(['_track']);
(function() {
    var ict = document.createElement('script'); ict.type = 'text/javascript'; ict.async = true;
 </script>
Your exact code snippet may differ from the example shown above, depending on what additional integrations you have set up.
In the final part of the process, you need to configure the integration and determine what visitor or call data you’d like to send to into Adobe Analytics.
This will be a two part process. You need to configure the integration in Adobe Analytics first and then map those settings into the Infinity integration.
Firstly, specify which events should be pushed and populated in your Adobe Analytics reporting, such as calls, conversions and goals. These can then be configured in your Adobe Analytics account.
Next you can configure which events will be pushed into your Adobe Analytics account, from the Infinity Portal.
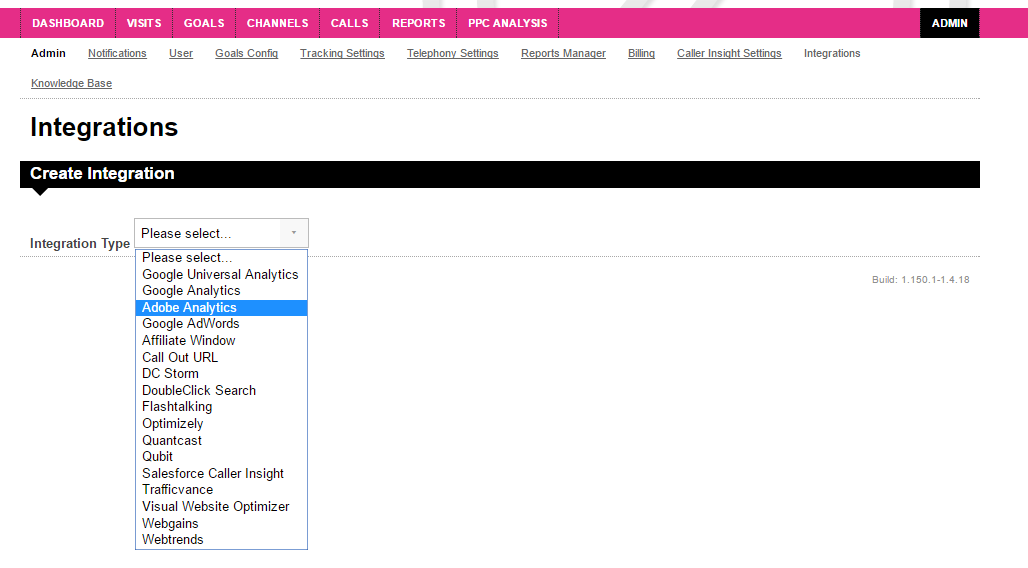
Log in to the Infinity Portal, navigate to the Admin section, and select Integrations.
At the top of the list of your integrations, select Add Integration, and choose Adobe Analytics from the drop down.
In the next step, we'll configure the integration.
Firstly you need to give your integration a name. It is Adobe Analytics by default but you can edit it. Choose something that you'll easily be able to identify later.
Then enter your FTP details provided by Adobe, these are the host url, together with your username and password.
Please note that if you should return to this page to edit your integration in the future, the password will be invisible. You can still amend it, you just won’t be able to see it.

Next you need to determine what data is passed through to Adobe. All Calls is selected by default, you can further refine this if you wish by clicking the + Add button to add additional criterion.
In addition you’ll need to specify what data is sent and how it is matched to your Adobe Analytics account. We'll do this by clicking the + Add Custom Dimension button.
Adobe Analytics uses two different terms to measure offline events, such as phone calls, namely Events and eVars. Events are completed visitor actions on your web site and in addition to the many built-in events, you can have up to 100 in Adobe Analytics. An eVar is a custom conversion variable, and records variables that are tied to events. Analytics provides you with up to 75 custom eVar variables. Further details on events and variables can be found here

To configure your integration, select a Custom Field (Custom Field, Pass-Through Field, Fixed Value) or choose from any of Infinity’s Standard Metrics from the drop down.
Next select whether you wish this to be mapped as either an Event or an eVar from the second drop down. We recommend you configure at least one event as a minimum, you can refine this further by adding in an eVar. The Adobe Analytics ID refers to the Event ID or eVar ID to map the field to.
Finally, enter your details and click Save to complete the integration.
Please login to rate this article


